

An overhead crane fault is rarely a random event — it's usually the end point of a chain that started with duty cycle mismatch, worn but undiagnosed components, or a replacement part that didn't quite fit. Procurement managers dealing with rising repair bills often reach for a parts catalog first, when the more useful first step is a five-minute diagnostic check.
If your team is seeing more frequent brake wear, motor overheating, or wire rope replacement than expected, the underlying cause is often not a defective machine. It's a mismatch between how the crane was specified and how it's actually being used, or a repair process that jumps straight to component swaps without confirming the root cause first.
This guide walks through the fault categories maintenance teams encounter most, the diagnostic sequence that catches most problems before a part needs replacing, and the three checks — duty class, load spectrum, and starts per hour — that explain why some cranes need far more repair than others. It closes with the purchasing mistakes and hidden downtime costs that rarely show up in a standard troubleshooting checklist.
Tabla de contenidos
What an Overhead Crane Fault Actually Is (And Why Diagnosis Comes Before Repair)
An overhead crane fault is any deviation from normal operation in the crane's mechanical, electrical, or hoisting systems, classified under duty and design standards such as ISO 4301 y FEM 1.001. These standards define how a crane is expected to perform under a given load spectrum and usage frequency — which is exactly why the same symptom can have two very different causes depending on how the crane is used.
Field data shows most faults can be diagnosed before any part is replaced
Across recurring field repairs, more than 70% of overhead crane faults can be identified through inspection alone, before a single component is swapped. Loose terminal connections, voltage fluctuation at the power supply, contamination on an encoder, a limit switch that has shifted position, or an over-wide brake gap account for a large share of "failures" that get miscategorized as component defects. The reason this matters commercially is straightforward: replacing a motor, VFD, or controller costs several times more than correcting a loose connection or a misaligned switch, and the wrong fix doesn't stop the fault from recurring. A maintenance approach that skips inspection and goes straight to parts ordering treats the symptom, not the cause — which is why the same "fault" often comes back within weeks.
The diagnostic sequence that catches problems before they become expensive
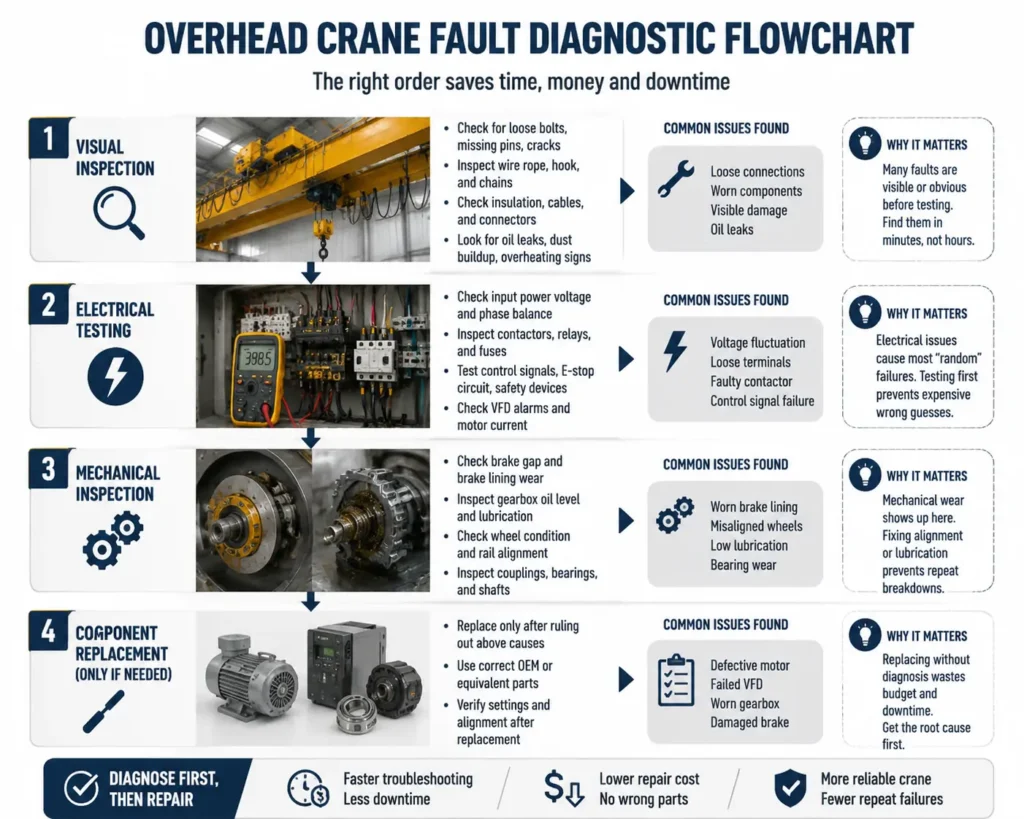
The most reliable order to work through a crane fault is: visual inspection → electrical testing → mechanical inspection → component replacement. Visual inspection catches obvious issues (loose bolts, worn insulation, visible wear) in minutes. Electrical testing checks voltage, contactor condition, and control signals before assuming a drive or motor has failed. Mechanical inspection covers brake gap, gearbox lubrication, and wheel-rail alignment. Only after these three steps rule out simpler causes should a component be replaced. Skipping straight to replacement is the single most common way maintenance budgets get inflated — an expensive part gets swapped in, the fault returns, and the actual cause (a loose terminal, for example) is never addressed.
Common Overhead Crane Faults by System
Overhead crane faults generally fall into three groups — mechanical, electrical, and hoisting-mechanism faults — and each has a distinct failure pattern worth recognizing before you start ordering parts.
Mechanical faults concentrate in the brake, gearbox, and wheel-rail interface
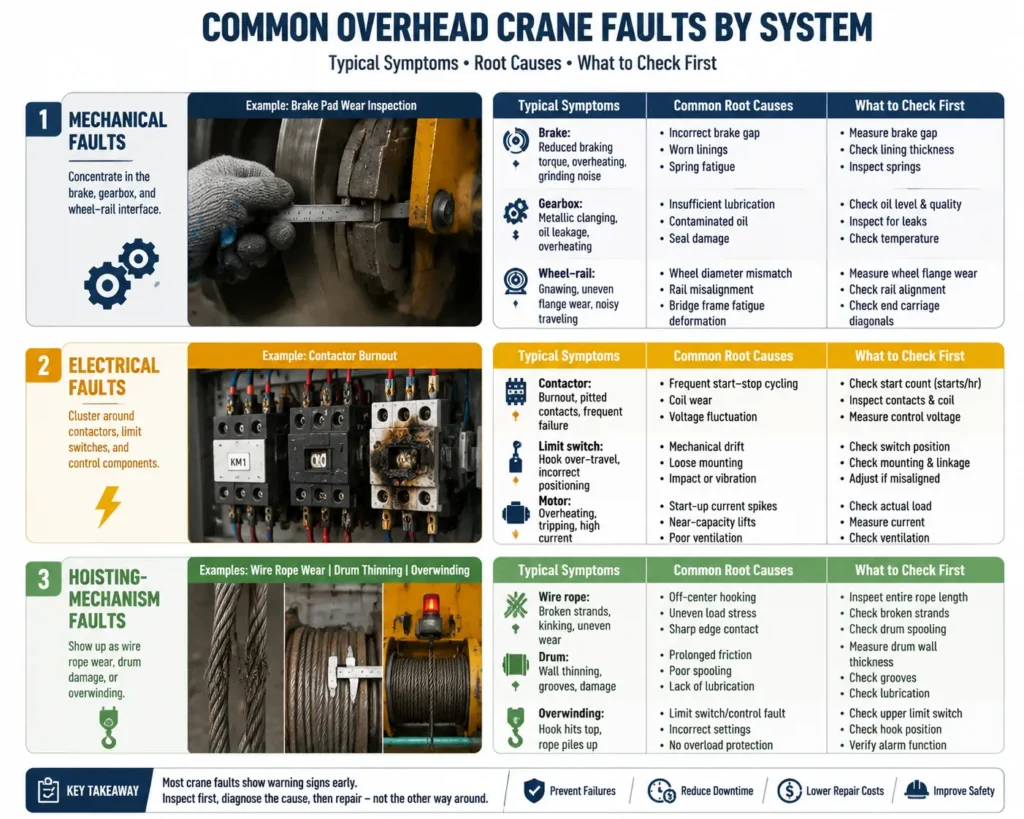
Brake, gearbox, and wheel components account for the majority of mechanical faults, typically showing up as overheating, abnormal noise, or uneven wear rather than sudden breakage. Brake faults (reduced braking torque, overheating, grinding noise) usually trace back to an incorrect gap between brake pad and wheel, worn linings, or spring fatigue — all detectable during a routine gap check. Gearbox faults (metallic clanging, oil leakage, overheating) are most often lubrication-related: insufficient or contaminated oil accelerates wear faster than load alone would. Wheel-rail gnawing — excessive wear on the wheel flange — is a slower-developing fault caused by diameter mismatch between wheels, rail misalignment, or bridge frame fatigue deformation; it's rarely obvious until the flange wear is already significant, which is why routine diagonal-measurement checks on the end carriages catch it earlier than waiting for visible symptoms.
Electrical faults cluster around contactors, limit switches, and control components
Electrical faults typically present as contactor burnout, limit switch failure, or motor overheating, most often triggered by frequent start-stop cycling rather than age alone. A contactor that opens and closes dozens of times per hour wears its coil and contacts faster than one used a handful of times a shift — so two identical cranes can have very different contactor lifespans purely because of how often they're started. Limit switch faults (hook over-travel, incorrect positioning) are commonly caused by mechanical drift rather than electronic failure, meaning the fix is often a physical repositioning, not a replacement. Motor overheating frequently correlates with startup current spikes from near-capacity lifts rather than a motor defect — which is a symptom worth cross-checking against actual load before assuming the motor itself is at fault.
Hoisting-mechanism faults show up as wire rope wear, drum damage, or overwinding
Wire rope wear, drum thinning, and overwinding are the three hoisting-mechanism faults that most directly affect lifting safety, and all three are detectable through routine visual and dimensional checks. Wire rope wear accelerates with uneven load stress (off-center hooking, load shape variation) more than with load weight alone, so broken strands or kinking often appear well before the rope's rated lifespan. Drum wall thinning results from prolonged friction between rope and drum and is measurable during scheduled inspection — waiting for a visible failure means the fault has already progressed past the point of easy correction. Overwinding is almost always a limit switch or control fault rather than an operator error, and it's one of the few faults where installing an audible alarm tied to hook position is more cost-effective than repeated switch replacement.
The Real Root Cause: Duty Class and Load Spectrum Mismatch
Repeated "component failures" — frequent motor overheating, fast brake wear, short wire rope life — are very often not defects at all, but a sign the crane is being used well outside its designed duty class. This is the single most common misjudgment procurement and maintenance teams make: they treat rising repair frequency as a quality problem with the equipment, when it's actually a mismatch between how the crane was specified and how it's operated day to day.
How a duty class mismatch disguises itself as component failure
A crane originally specified for FEM/ISO duty class M3 or M4 — moderate usage, moderate load factor — behaves very differently when it's actually run at M6-level frequency: near-100% rated load on most lifts, and a starts-per-hour count well above what the original class assumed. The visible symptoms are exactly what you'd expect from a "bad" motor, brake, or wire rope: repeated overheating, fast lining wear, shortened rope life. But the root cause is duty cycle, not component quality — and no amount of part replacement fixes a duty class mismatch, because the replacement part is rated for the same original duty class and will wear out at the same accelerated rate. This is why maintenance costs on a mismatched crane keep climbing year over year even as parts get replaced on schedule.
Three checks to run before replacing anything
When repair frequency is trending upward on a crane that isn't old enough to justify it, check these three items before ordering parts: Crane Duty Class (what the crane was originally rated for, typically referenced against ISO 4301 or FEM 1.001 classification), Load Spectrum (what proportion of lifts are near rated capacity versus lighter loads), and Starts per Hour (how many start-stop cycles the crane actually performs versus the design assumption). If actual usage significantly exceeds the original duty class, the fix isn't another brake replacement — it's either adjusting the operating pattern or specifying a higher duty class crane or hoist for that application going forward. Many of the highest maintenance bills we've seen trace back to exactly this mismatch rather than to any single defective part.
Common Purchasing Mistakes That Cause Repeat Failures
The most common purchasing mistake in crane repair is buying a "same model" replacement part based on appearance alone, without confirming electrical parameters or communication protocol compatibility. VFDs, brakes, limit switches, and radio remotes look similar across brands, but their interfaces, parameter sets, and communication protocols frequently aren't interchangeable — and the failure only becomes visible after installation.
Why "compatible" parts often aren't
A lower-cost VFD or brake purchased as a drop-in replacement commonly fails at the integration stage rather than the component stage: it won't mount to the existing bracket, its electrical parameters don't match the motor or control system, or its communication protocol doesn't talk to the PLC. The result reported by overseas buyers is a familiar pattern — the part can't be installed as expected, parameters can't be matched, the PLC throws repeated alarms, and total downtime ends up longer than if the OEM part had simply been ordered in the first place. The apparent cost saving on the part itself is usually smaller than the labor and downtime cost of troubleshooting a mismatch that shouldn't have happened.
What to confirm before you order
Before ordering any electrical or control component as a replacement, confirm four things against the existing system: OEM Part Number, Electrical Parameters (voltage, current, control signal type), Mounting Dimensions, y Communication Protocol. This applies most strongly to VFDs, brakes, limit switches, and radio remote controls — the four component types most likely to differ between manufacturers even when they look identical from the outside. A five-minute confirmation against these four points before ordering is far cheaper than a failed installation and a second shipment.
The Hidden Cost of Downtime — And What to Keep in Stock
The largest cost in a crane fault is rarely the repair invoice itself — it's the production time lost while the crane is down. A repair that costs a few hundred dollars in parts and labor can trigger a production-line stoppage, idle labor, and shipment delays that add up to several times the repair cost.
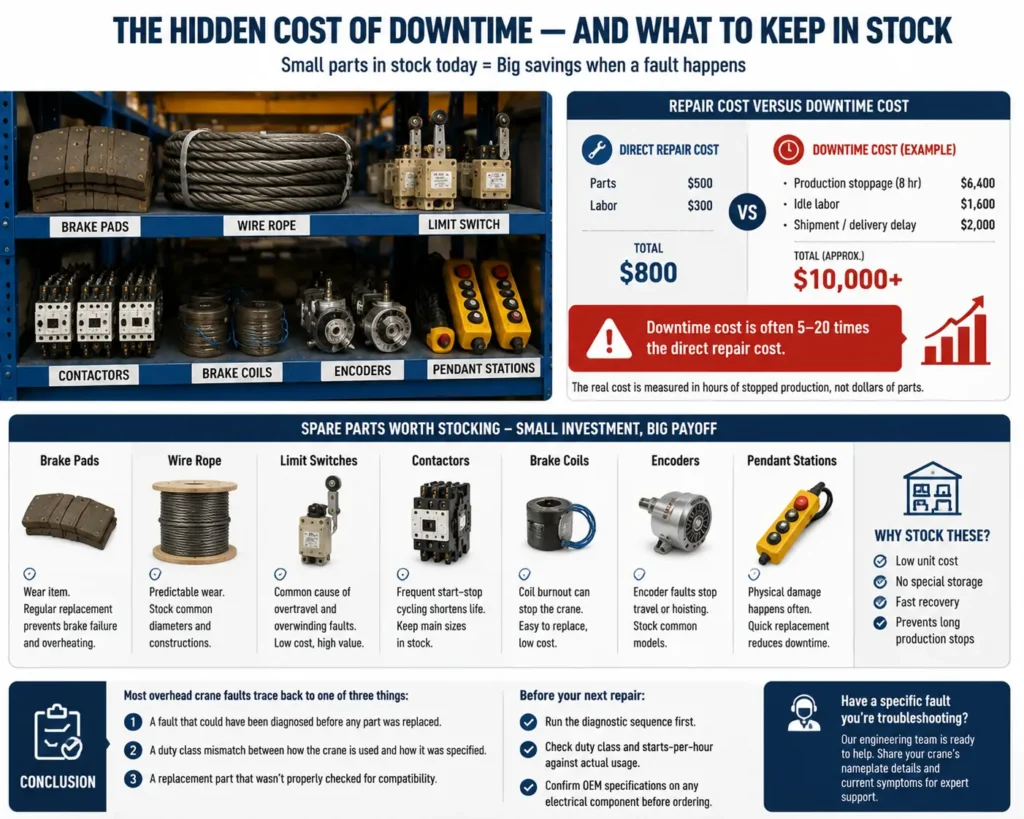
Repair cost versus downtime cost
In one representative case, a crane repair costing around $800 in parts and labor led to roughly eight hours of production stoppage — with the line waiting, labor sitting idle, and an outbound shipment delayed as a result. The combined cost of that downtime, once labor and delivery delays are counted, typically runs into several times the repair bill itself, sometimes reaching tens of times the direct repair cost depending on the production line's value per hour. This is the calculation that changes how factories think about spare parts: the repair invoice looks small, but the real cost is measured in hours of stopped production, not dollars of parts.
Spare parts worth stocking, and why the inventory cost is low relative to the payoff
Keeping a small stock of frequently-replaced components shortens fault recovery time dramatically, and the carrying cost of that inventory is low compared to even a single unplanned stoppage. The components worth keeping on hand are the ones that fail on a predictable wear cycle rather than randomly: brake pads, wire rope, limit switches, contactors, brake coils, encoders, and pendant stations. None of these are expensive individually, and none require special storage conditions — the barrier to stocking them is usually just not having thought about it until after the first extended stoppage.
Conclusión
Most overhead crane faults trace back to one of three things: a fault that could have been diagnosed before any part was replaced, a duty class mismatch between how the crane is used and how it was specified, or a replacement part that wasn't properly checked for compatibility. Before your next repair, run the diagnostic sequence first, check duty class and starts-per-hour against actual usage, and confirm OEM specifications on any electrical component before ordering. Getting ahead of these overhead crane faults with a small spare parts stock is usually cheaper than the downtime from waiting for the next breakdown.
Have a specific fault you're troubleshooting? Our engineering team is available to review your crane's duty class, load spectrum, and maintenance history — reach out with your crane's nameplate details and current symptoms.

Especialista en Equipos
Gerente de Negocios de Grúas con experiencia y amplia trayectoria en gestión de proyectos de elevación pesada y supervisión operativa. Historial comprobado de impulso del crecimiento de los ingresos y garantía del cumplimiento de las normas de seguridad.
Preguntas frecuentes
Q1: What are the most common overhead crane faults?
The most common overhead crane faults involve the brake, gearbox, contactors, limit switches, and wire rope. Brake faults show up as overheating or reduced torque; electrical faults cluster around contactor burnout and limit switch drift; hoisting faults appear as wire rope wear or drum thinning. Most of these are detectable during routine inspection before they cause unplanned downtime.
Q2: How do you diagnose an overhead crane fault before replacing parts?
Follow a fixed sequence: visual inspection, then electrical testing, then mechanical inspection, and only then component replacement. This order catches loose connections, voltage issues, and misaligned switches — which together account for a large share of reported faults — before assuming an expensive component has failed.
Q3: Why does duty class mismatch cause repeated crane failures?
A crane specified for a lighter duty class (e.g., M3/M4) but operated at a heavier cycle (e.g., M6-level frequency and near-rated loads) will show accelerated brake wear, motor overheating, and shortened wire rope life. Replacing parts doesn't fix this — the new part is rated for the same original duty class and wears out at the same accelerated rate.
Q4: Can I use non-OEM replacement parts on an overhead crane?
It depends on the component. Many parts are interchangeable, but VFDs, brakes, limit switches, and radio remotes often differ in electrical parameters, mounting dimensions, or communication protocol between manufacturers. Confirm OEM part number, electrical parameters, mounting dimensions, and communication protocol before ordering a substitute to avoid installation and PLC compatibility issues.
Q5: What's the real cost of overhead crane downtime?
The direct repair cost is usually the smaller number. A repair costing a few hundred dollars can trigger hours of production stoppage, idle labor, and delivery delays that together cost several times the repair invoice. This is why maintaining a small stock of fast-wear spare parts (brake pads, wire rope, limit switches, contactors) is typically cheaper than the downtime from an unplanned failure.
Artículos relacionados
- Inspección de grúas puente: Normas oficiales, recursos y enlaces rápidos
- Overhead Crane Inspection Services: Pricing, What’s Included & How to Order
- ¿Qué es la inspección de grúas puente? Tipos, frecuencia y elementos clave de la lista de verificación.
- Inspección de grúas puente: Normas OSHA, CE y GB: lo que compradores y exportadores realmente necesitan saber.

 English
  العربية
  Español
  Français
  Português
  Русский